Thursday 23 June 2016

WORK TOGETHER

WORK TOGETHER- an interactive audio installation
1work together.JPG
WORK TOGETHER is intended to encourage people to work together, and rewards them for doing so by playing a sound that is more than the sum of its parts. WORK TOGETHER is an audio installation built from recycled furniture, broken bicycle wheels, an old speaker, and an Arduino Nano.DSC_0846.JPG
Turning one wheel causes a note (always the same pitch) to slowly get louder. Spinning the other wheel does the same, although this second note is a major third above the first one. Spinning both wheels plays both notes, as well as five more, forming a dense major seventh chord. This pleasant chord rewards the two people for interacting and working together.
DSC_0850.JPG
The speed of the wheels is detected by small momentary buttons which are hit by pieces of rubber on the wheels (shown above). The Arduino figures out how often this happens and generates a tone. Each wheel has it's own tone, and if both are spun together, the Arduino puts out a big major seventh chord. These signals are manually bit-banged out of the Arduino, run through a tone knob (pot+filter cap) and then amplified by an LM386 chip, which powers the speaker. All of this runs off a 9V battery.DSC_0851.JPG
Above: The control plate inside the box of the installation (shown detached) with an output jack, power switch and LED, volume knob, tone knob, and input jack respectively (from left to right). The cable ties hold the 9V battery in place.
Below: The Arduino nano and LM386 amplifier. These are not currently functioning properly.
DSC_0852.JPG
The use of recycled materials is important in this installation because it means that the installation has no environmental footprint whatsoever. No extra energy was expended to produce the parts for this project, apart from maybe the electronics. Everything else was recycled (the wooden table used to be two couch squares), the wheels were headed for the landfill (the rims are too damaged to ever be roadworthy again) and the speaker was harvested from an old broken guitar amplifier. The important thing about building public installations from recycled materials is that it sets an example for what can be achieved purely with recycled materials. Many artists have already been concerned with this, and rather than avoiding it as passé or cliché I think it’s important to join them.


While the project does not address any particular ecological issue, what it does have is an essentially social focus which is critical for engaging ecological issues. In order to work together on tackling planetary issues of human consumption and pollution, we need to learn to work together as individual people first. The intention of this installation is to provide a fun and interesting experience that the user/interactor can take away and remember.


Link to video of the installation in action: https://www.youtube.com/watch?v=IGhwSP9-1rY


Thanks to:
Bike Barn on Tory Street for providing the wheels.
Chris Wratt for helping me get my head around scheduling on an Arduino.

My fiancé for tolerating this weird-looking this with wheels on in the living room.

Fog (sonifying everyday life)

Fog (sonifying everyday life)
Activity Sonifier


This program listens to your mouse and keyboard inputs and plays different sections of soundscape to accompany your activities, based on the type of input (arrow keys, numbers, letters etc) and the frequency of those inputs. This provides a complex and lush sonic accompaniment to help you focus on your everyday activities.


How the program works:


The various inputs (letters, numbers/symbols, arrow keys, mouse buttons and modifier keys) are processed so that when an input event happens (let's say a letter key is pressed) then the input section spits out a number, based on the type of input (for a letter key, the input section would put out a 1). This prevents the program from logging your exact data, which is important.
The last 100 input events (or rather, the type of input events) are stored in an array. A cpu timer is sampled every time an input event happens, and the time between the new event and the previous event is stored. The times between the last 100 input events are stored in a similar array.
If statements figure out which type of input event is currently the most common type of input event stored in the array. The current most common type of input event dictates the kind of sounds being triggered. The mean (average) time between the input events is calculated from the data stored in the time array. This mean time is fed into a clock, which decides how often a sound should be triggered (the mean time is multiplied by 50).
There are 40 different 2-minute sounds that can be triggered. These are in five sets of eight, with each set corresponding to a type of input. The sounds have long fades on each end to create a smooth listening experience.
For example, if the most common type of input is currently the WASD/arrow keys, and the mean time between input events is 350ms, then a sound from the arrow key set will be triggered every 35 seconds (the mean time is multiplied by 50). If every sound in a set is already playing, the program does nothing. As soon as a sound finishes it can be triggered again, regardless of the state of the other sounds in the set.


Sounds
Five tracks were used in the program. Each track is tied to an input type. Within each input type, the speed of each track is altered. This makes a similar-sounding collection of related soundscapes for each input type. This could easily have been more complex (with eight completely different sounds for each input type) but in the interest of filesize and compositional consistency this simple solution was found.


Descriptions of each track:
Letters:
Ambient music provided in CMPO 211.


Numbers/Symbols:
Found sounds of the air-conditioning system on the fifth floor of the library in Kelburn.


Arrow keys/WASD:
My soldering iron makes a very quiet hum, which switches back and forth between a few different notes.


Mouse buttons:
Found sounds, dripping noises from a bathroom at the NZSM. Also present are birds chirping.


Modifier keys:
Ambient track mentioned above.


All of these tracks were processed in Reaper so that they can be played continuously, as well as some cleanup/EQ and spatialisation.


This program currently only works if the user has the Max window (can be any Max window) in focus. The original dream for this program was that it could listen to the mouse and keyboard while the user is going about their other activites on their machine, and provide a comfortable sonic background to their acitivities. Implementing this is difficult but I would really finish the project.
Also, the sounds are quite limited, which makes the program feel stale after just a few minutes of use. A future version of this program could refer to a vast online library of soundscapes, bringing the listener unfamiliar music every time the program is run. Another option would be to make the sound libraries selectable by the user. Sounds could also be generated within Max itself, stochastically.
One goal for the program is to make it sensitive to different frequency of user input. If the user is typing frantically the sounds should be thick and complicated; but if there are long pauses between input events (for example of the user is reading an article, scrolling slowly) then the sound should become thinner. This is currently only crudely implemented, and there could be a much finer, broader dynamic range to this sensitivity.
Finally, the other thing that the program really needs in future is the ability to run as a standalone application. This vastly widens the pool of people who could easily download and use the program, and if kept open-source the users could modify to suit their needs.


The program, as a whole and despite some limitations (particularly the fact that the user has to have a Max window in focus) works surprisingly well. The dynamic range of the combined sounds is not quite properly mapped to the frequency of user inputs, but it does work. The overall wonderful noisy mess of the whole thing (especially when you change the kind of input type) is quite complex and immersive, and lacks any kind of sharp, transient sounds that would distract the user.

The purpose of the program is to provide a listening environment that helps the user focus on the tasks at hand, and stops them from being distracted from extraneous noise. Not all users need this kind of aural distraction or filler but with the success of video game music that is intended to help focus and to immerse you, and with the prevalence and wide-spread acceptedness of these kinds of interfaces and experiences, I felt that it was worthwhile to create a simple program that does just this.

Friday 13 November 2015

Headphone Array

Here is a video of this in action.
Overview
The Headphone Array is an interactive sound installation. Users are invited to come, plug their headphones in, and listen. The more people that plug in (maximum of nine) the more interesting the music becomes: With each new user, an extra layer of music is added. It doesn’t matter which jack you plug into; they are all identical. The project aims to reduce the solitary isolation of headphone listening and create a memorable and interactive experience.
The box itself is powered by an Arduino Uno with sparkfun’s mp3 shield and a behringer headphone amp. The music is written in ChucK and Reaper, using simple synthesis and compositional techniques.

Motivation
A common way to listen to music these days is to carry a select bunch of songs with you, and listen to them through headphones or earbuds. Like many things in a commercial/industrial society, this isn’t a bad way to do it; but it’s lacking several things. While portable, this listening style prevents people from listening together (splitters do exist but they’re not particularly common), and the music is not locked to a particular location. Memories of music in particular places or situations are often stronger than the music you can take with you: Live gigs will stay with you the rest of your life, but you’ll forget about that song you listened to on the bus this morning as soon as you get to work.
This project aims to repair some of those emotional ties that have been lost with modern headphone-based listening by fixing the sound to a particular location (wherever it is installed) and by making the piece interactive and collaborative (the prescence of each listener alters the sounds). Listeners are encouraged to interact with the installation on their own terms (i.e. with their own headphones) and also to interact and listen with one another.

Related Works
It is difficult to find other sound installation works as they are few and far between. However, two pieces were critical in the formation of this project: Mort Garson’s Plantasia album, and Tristan Perich’s 1-Bit Symphony. The best way to describe Garson’s work is ‘lovely’. It consists almost exclusively of beautiful analog 70s synthesisers, arranged in pretty rhythmic patterns. There is a certain kind of peace to the music; it claims to be music for plants and exhibits a certain kind of emotional healing. This is very much a concern of this project; the music must be peaceful and inclusive and just plainly beautiful.
Perich’s 1-Bit Symphony is an algorithmic piece, written for a single small chip mounted with a button cell and a headphone jack inside a CD case. Perich says that just because the sounds present (triangle waves, square waves etc) are simple, that the music itself doesn’t have to be simplistic. His piece is very musically complex, but is entirely based around simple synthesis. This, combined with the headphone listening method, and the fact that the music is tied intricately with the location where it is made (the CD case), makes it stand out among other sonic arts projects.
Both Garson and Perich seek to heal damage that has been done; and they do this by making music that is simply beautiful. This project sought to achieve the same effect, and reinforced it through user interaction and collaboration.


Technical Overview

Construction
The layout of various circuits in the box.

Components:
Arduino with MP3 Shield
Distro and Line Out board
Behringer HA400 Headphone Amp
Car USB Charger
9 Headphone jacks, each one with a momentary button hot-glued to the back of them (such that the button pokes into the back of the jack).

Signal Flow
The stereo signal comes from the MP3 Shield, down a cable and some headers to the distro board, where it is split between the line out circuit and one of the headphone outputs (more on this later). From the DC offset/line out circuit, the stereo signal goes across the box to the Behringer headphone amp. This amp splits it into 4 and amplifies/buffers the signal, which goes back across the box (4 separate cables, each with L,R, and ground) back to the distro board, where each channel from the amp is split and sent to two of the headphone outputs. With 4 channels on the amp and each one powering two headphone outputs, the extra headphone output was simply powered by the MP3 Shield itself.
Each of the headphone jacks has a single 3-core cable (L, R and ground) soldered and hot-glued to it, and ending in a 3-pin male header. These headers all plug into a large 2x14 pin female header on the distro board.

Power
The Behringer headphone amplifier board required 12V, which worked well because 12V-5V converters are very easy to find. A Car USB charger was used to step this down, which was good because while the Arduino’s regulator can technically handle 12V, it gets very hot and can reduce the lifespan of the Arduino. The only problem was fitting everything in the box, which took a few calculated guesses before I got the cable lengths right.

Code
The Arduino is constantly polling the jacks. When a change is read, the Arduino stops the current track, counts how many jacks are down (plugged in), and plays the corresponding track from the SD card on the MP3 shield. Then it goes back to polling. This was surprisingly difficult to implement, and several weeks were spent troubleshooting the code. It compares two different arrays with each loop, and writes one to the other at the end of the loop. Each array is 9 positions long and contains the data from each jack (when I say jack here, I mean the state of the momentary button on the back of it). The ground wires on those jack buttons are daisy-chained together, and the signal wires go to pins 0,1,5,10,A0,A1,A2,A3 and A4. The other digital pins are all used by the synchronous serial system used for communication between the Arduino and the MP3 shield.

The 9 tracks of music were written in ChucK using very simple synthesis and compositional techniques. Midi notes were stored in arrays, which were then fed to oscillators. Various delays and reverbs were used, with the intention of making calming music that drew the listeners in. The tracks were mixed in Reaper.

Line Out System
Because of how the MP3 shield works, the ground of it’s output isn’t actually 0V, it’s actually 1.25V. The hookup guide on the Sparkfun page had a comprehensive guide on how to build a circuit to remove the DC offset:
Future Work

More headphone-specific music needs to be made. Headphones are wonderful things that allow listeners to experience sounds without distracting or annoying anyone around them, and can immerse the listener into a total sound world. The interesting thing about this project was that the music itself is stored on an SD card on the MP3 Shield, so technically any music could be used as long as it fitted on the SD card.

Thursday 12 November 2015

Project Report for Stockholm Syndrome For City Hum

Utting CMPO 306 Major 2 Project Report
Stockholm Syndrome For City Hum
Video: https://youtu.be/Q0XE3_TrpCU

Successes and failures
•The most noticeable success (for me) with this piece was the creative stability that came from basing the whole piece around a score. In the past it was very difficult as part of the improvisatory/compositional process to record anything at all. Everything that would possibly go wrong did, and by the time I got everything working satisfactorily I had lost two hours and run out of creative energy. Using a score meant that the technical documentation of the piece did not interfere with the flow of generative and selective creativity, which was very freeing.


•Complete flexibility of notation was key to this piece’s construction. For a long time I sort of shunned musical notation (beyond primitive guitar tab and basic performance instructions) because of the negative influence it can have on the interaction between performer and the sound they’re sculpting. In each of the 16 events (they’re not really bars) in the piece, time is fluid and the sounds are represented by colours.


•The piece is difficult to replicate. The hum was often surprisingly different; not just in the character of it but the level too, and exponentially more so towards the end of each event and the end of the piece.


•The bass guitars would often produce slightly different harmonic beating rhythms, which changed the character of different phrases. The tuning of both instruments had to be carefully reset between takes. It was well worth doing though because the altered tunings offered some fantastic rhythmic information, especially when sustained with the compressor.


•Using the hums and buzzes that were present (rather than working technically to minimise them in the middle of a creative flow) was a suprisingly natural process in which the equipment was explored with both curiosity and presicion. This should be taken to much greater lengths, and is something that would really help with slow/drone music in general.


Creative method and workflow
•The piece spent a lot (too much; months) of time in limbo before it was finally nailed down. An engineering approach turned out to be the best: The piece simply needed to exist, and it needed to have a function and fulfill it well. To be anything more than that would hinder it’s purpose. That function was to illustrate the sounds present by approaching them phenomenologically and unfolding them in a logical fashion for the listener.


•The piece was originally going to be for one bass guitar and ChucK (real-time musical porgramming language) but it was difficult to find a reliable, simple way to make ChucK respond to and interact with a live performer. Several short programs were experimented with but to take them further seemed like it would lead to a different kind of project. Instead, seeing as I have two basses, it occurred to me that maybe I could tune them slightly apart from one another and just play those.


•Having a dedicated space to work in really helped with the creative process. Packing the gear down between sessions basically had the effect of changing the piece every time. It didn’t change it a lot, but it was just enough that it got very confusing as to what the piece was actually going to be. It was easy to get off topic and ultimately cost me several weeks in a fairly heavy creative block. Leaving everything set up meant that when I returned to it, it still sounded the same and responded in the same ways. This drastically improved creative flow.


•I find it really easy to find a sound or tone I like, and a few note combinations that illuminate it. Larger structures are more difficult. Notes (not the musical kind) and chords that worked well together (following each other) were written down in google docs, which was left open the whole time; including the times when I wasn’t actively working on the piece. This is something I’m going to try and do for every project in future. It meant that tweaks and passing thoughts could easily be slipped in.


•The tab-based system was great because it worked in a text editor, rather than on paper or in a midi program. The blue and yellow colours were added later by hand, and serve as a description of the levels of the two sounds at any given time (the two sounds being the guitars and the hums). I wasn’t sure if they were neccessary but it was clear when it came to the recording: I could stay in a technical mindset while playing (setting levels, camera and mic positions etc.) and let my past (creative state) self unfold from the page. The colours made the score more visually interesting and easier to follow.


Tips for future work:
•It might sound weirdly simple, but use Chion’s Reduced Listening technique. If you like to play within an established musical context, it’s the only way to truly know what your gear is capable of. In this piece it transformed the background hum from a dreaded lump in my heart to a volatile instrument full of worth and fascination.
•Leave everything set up and the files open. This preserves the nature of the piece.
•Make snap, rash decisions for creative reasons. If for whatever reason it doesn’t work later, you’ve learned something about yourself and your sounds and you know how to fix it.
•Have a day (or a week) without Reddit and other social media. You’ll need content so badly you’ll make it yourself, and you’ll make sure it’s good.
•Max out your compressor. You’re making new music, not fixing kick drums. There’s a whole world above that threshold.


The most important thing I gained in writing this work:

•The fast/cheap/good triangle is a lie. With large creative works, a lot of work done quickly is rewarding, exciting, and bound together by it’s temporal proximity to itself; resulting in a homogenous and thorough creation.

Wednesday 11 November 2015

Stockholm Syndrome For City Hum- A piece for 1 player with 2 bass guitars.

This post is the score for this piece of music. A video performance of it can be found here. The piece consists of 16 actions over about 6 minutes. The performer interacts with the 'natural' hum of the gear. You're welcome to play it whenever or wherever you like, but please attribute it according to the standard creative commons attribution license. Also please let me know :)


STOCKHOLM SYNDROME FOR CITY HUM


This piece is a metaphor for those hums and other buzzes we hear that we have little to no control over; those ambiguous sounds we hear in the night, in the city. Inspiration for this piece came from a sound I hear every day, through every speakers in my house. This sound is apparently some reset signal for hot water cylinders. This intermittent, quasi-rhythmic hum is both infuriating and pervasive. It is so constantly and obviously present that it sometimes becomes comforting.

Gear:
2 Bass Guitars (1 player)
Compressor (10:1 ratio, min threshold, min attack, max release, +10dB). I use an Alesis 3630.
Powerful Bass Amp
Crowther Hotcake overdrive pedal or similar. (level at unity, max tone, drive at 2 o’clock)

Routing:
Bass 1 => Compressor => Hotcake => Amp input
Bass 2 => Compressor
You will need a y-cable or connector for this. Also required are 4 jack leads (2 can be patch cables).

Instrument Setup:
Wear both bass guitars with straps as you would normally do, but push Bass 2 to the right-hand side (reverse this for left-handed playing). Bass 2 will is not fretted at all in the piece, so only the plucking hand is needed for it. Bass 1 is worn and played normally, with both hands.
Much of this piece consists of controlled low-frequency feedback (the compressor really helps with this) and thus the player’s proximity to the amp is crucial. At more than 2m distance the amp would have to exceed a safe listening level for the notes to sustain properly.

The other thing that the player is controlling is the hum/buzz. When this high-gain system receives no signal, it amplifies whatever it can find, resulting in a buzz. In the score, The notated dynamics relate only to the strength with which the strings are plucked. The blue represents the guitar signal, and the yellow represents the hum. The line between the colours describes the length of time that the notes should linger before the hum creeps in. This is mostly controlled by the timing (indicated at the start of each bar) and the velocity with which the strings are plucked (notated as dynamics markings) but in sparse music like this a visual indication of what’s going on is very useful.

The ‘touch’ and ‘no metal’ markings indicate whether the player should be grounding the metal on the guitar or not. Any metal part on the instrument is fine. Most electric guitars and basses have a buzz when they’re not grounded to the player (usually through the strings). Letting this buzz come through and hit the compressor is a large part of the aesthetic of the piece.

Tunings:
Both basses are downtuned. The F string on Bass 1 is a tone below the G it would usually be in standard tuning. The low B on Bass 2 is a fourth below the E that it would be in standard.

Bass 1: Bass 2:
F2 E2
B1 B1
F#1 F#1
C#1 B0


Tuesday 10 November 2015

White Box With Sliders (381 interface design course final project)

Morgan Utting 381 Final Project
White Box with Sliders
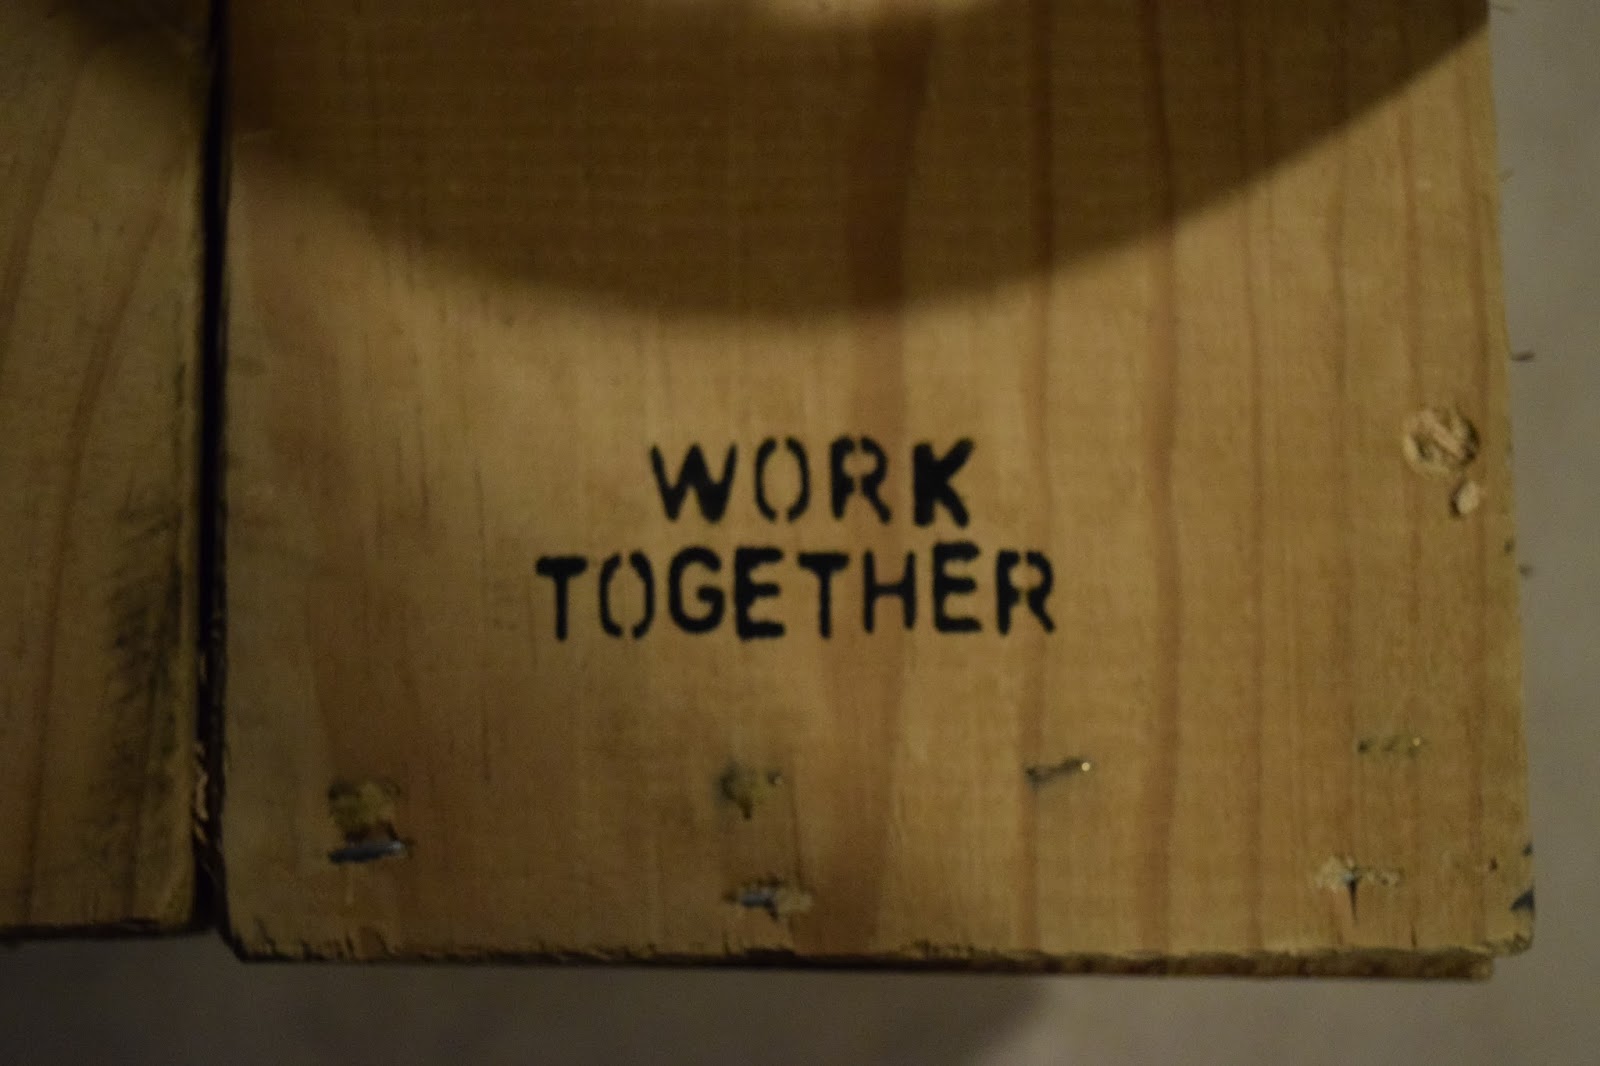
Fig. 1: Top view.
Overview
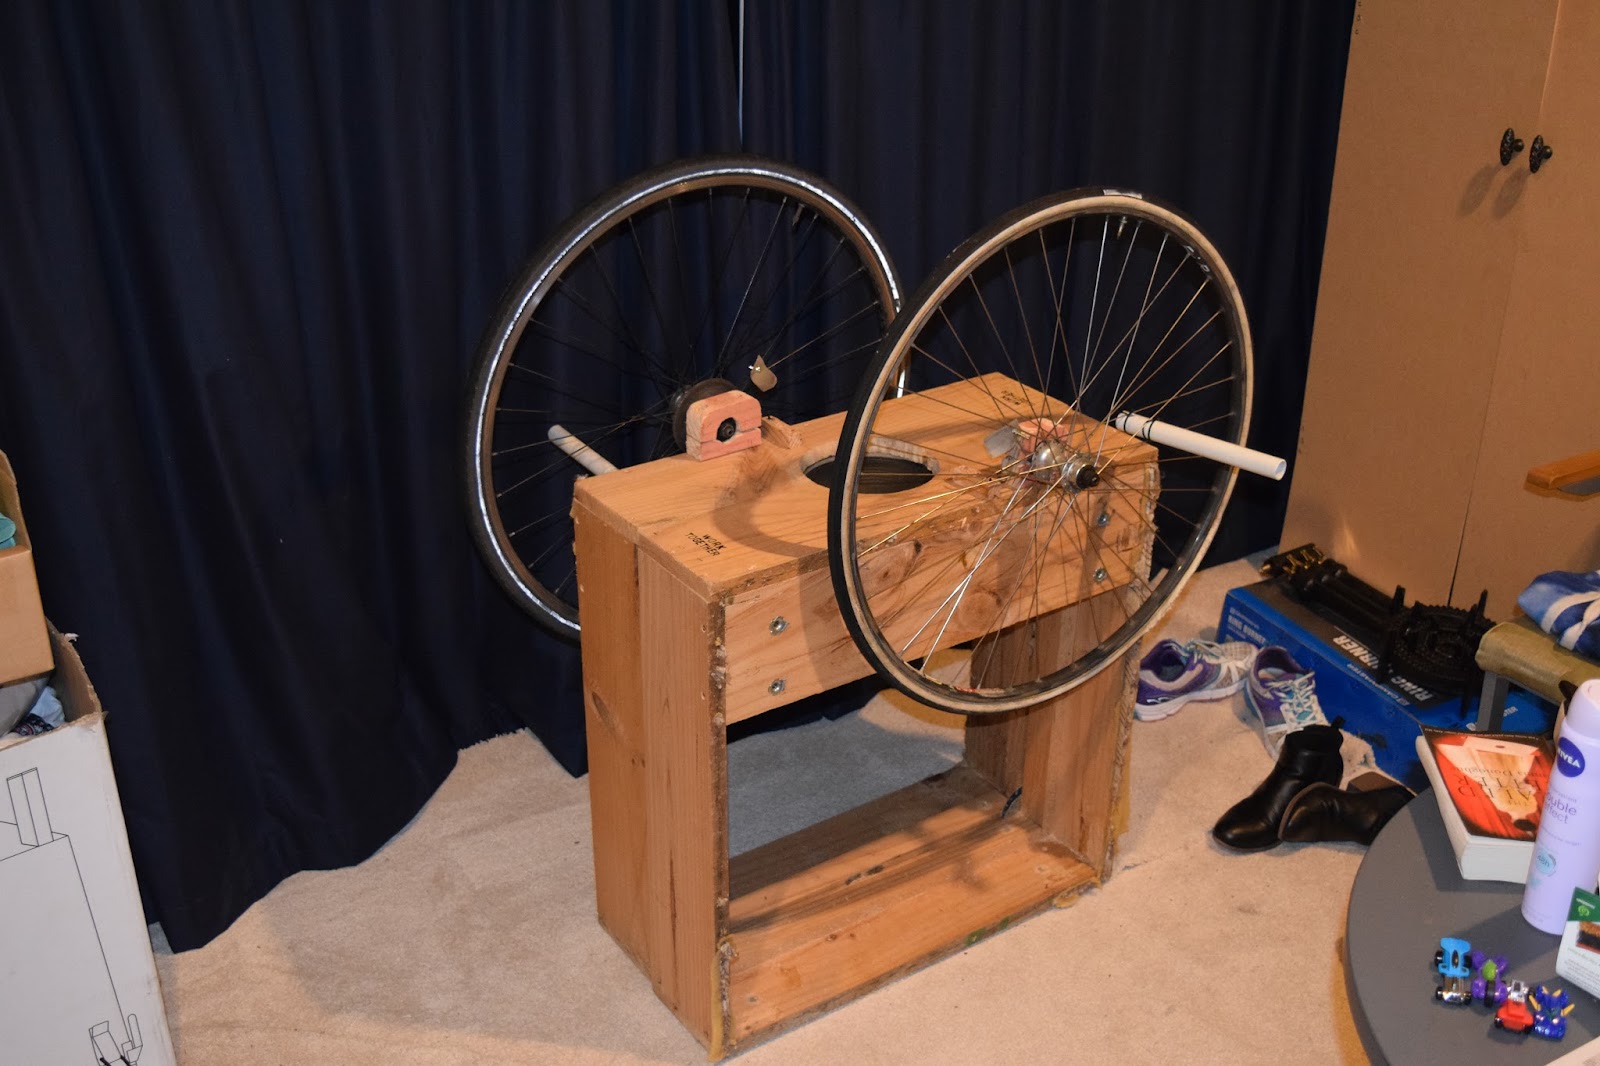
This is a white box about the size of a small (musical) keyboard, with two sliders across it. Inside the box is an Arduino which constantly sends serial information to a laptop via a USB cable. The laptop is running a ChucK program which parses the serial data from the box and feeds those numbers into the frequency input of two oscillators. Move the sliders, and the frequency of the oscillators will change. To the left there are low frequencies, to the right there are high ones, much like a piano (but not quantized to any musical pitch system). In the ChucK program, one oscillator modulates the microphone input as a conventional ring modulator (.op mode for Gain ugens, more on that below) and the other is an accompaniment. A Zoom H4n is used (in usb audio interface mode) as the microphone input as well as the output to the speakers. This isn’t strictly necessary but works a lot better than just the laptop’s mic and speakers, as you can change both the input and output level on the device itself (and the mics are a lot better). Headphones can be used with this project; but using speakers is a great deal better because it produces a much more interesting sound world. Both the accompaniment oscillator and the output from the ring modulator are acoustically fed (from the speakers, to the mic) back into the ringmod system, resulting in a much richer variety of sounds. This system uses a microphone input because I love to be able to sing with my machines.


Physical Systems
Parts List
Box:  Five pieces of wood, one sheet of plastic, 30 screws.
Sensors:  Two lengths of NiChrome wire, two small bolts, an arduino (with screws), a USB cable, two small bits of wood (the fader knobs), plenty of hot glue and solder, and about 2m of wire. Also a laptop, and optional audio interface.
Tools: Stanley knife, can’t stress this enough. Screwdriver, drill, hot glue gun, soldering iron, Arduino IDE and a copy of ChucK. A holesaw bit and a rasp were used to form the carry handle.
Fig. 2: Side/top view. Note the slightly weird (but cool) screws.


Interface Design
One of the concerns from the start of this project was that it had to be comfortable and expressive for the user. The interface was carefully designed to feel like a mixing desk or a USB midi or keyboard controller, with places to rest your palms as well as a nice comfortable finish with no burrs or sharp edges. The wooden ends were sanded to be ultra-smooth and high-quality, slightly unusual screws were selected, not only to be useful but to set it aside a little from the other pieces of gear we use to make music with. The components of any piece of gear contribute subtly to the uniqueness of that instrument, which (in the musician’s head, or at least in my head) connect with the sounds produced when playing that instrument. This is particularly important when it comes to one-off sonic arts projects or custom-made instruments, as many of these creations lack a certain identity and are often too open-ended in function to be truly considered instruments (that a user would remember fondly, and want to play again in future). Instruments need to do a small number of things, beautifully. In this way, interfaces are limited in a compositional sense, which improves them.
Fig. 3: Bottom view.
The box consists of two wooden ends, a wooden back and front, and a plastic top. It is roughly 59x22x8cm in size (length, depth and height respectively). A carry handle is cut through the back piece in order to make it more portable. All joins are made with screws. Two slits are cut in the plastic top for the sensors, with the arduino mounted on the underside of the sensor mount (another piece of wood). There is also a really subtle green power-indicator LED which shines through the plastic top in the top-right corner, just to let the user know that everything’s working. The wood was reclaimed from an old desk and some leftover 2x4, and the plastic is reclaimed 2mm shower liner. Reclaimed materials are important for several reasons: Recycling stops unneccessary wastefulness and reclaimed materials are a lot cheaper than new ones. Also, making things out of what we have rather than what we have to go and buy limits us healthily and promotes good, flexible designs.


Sensors
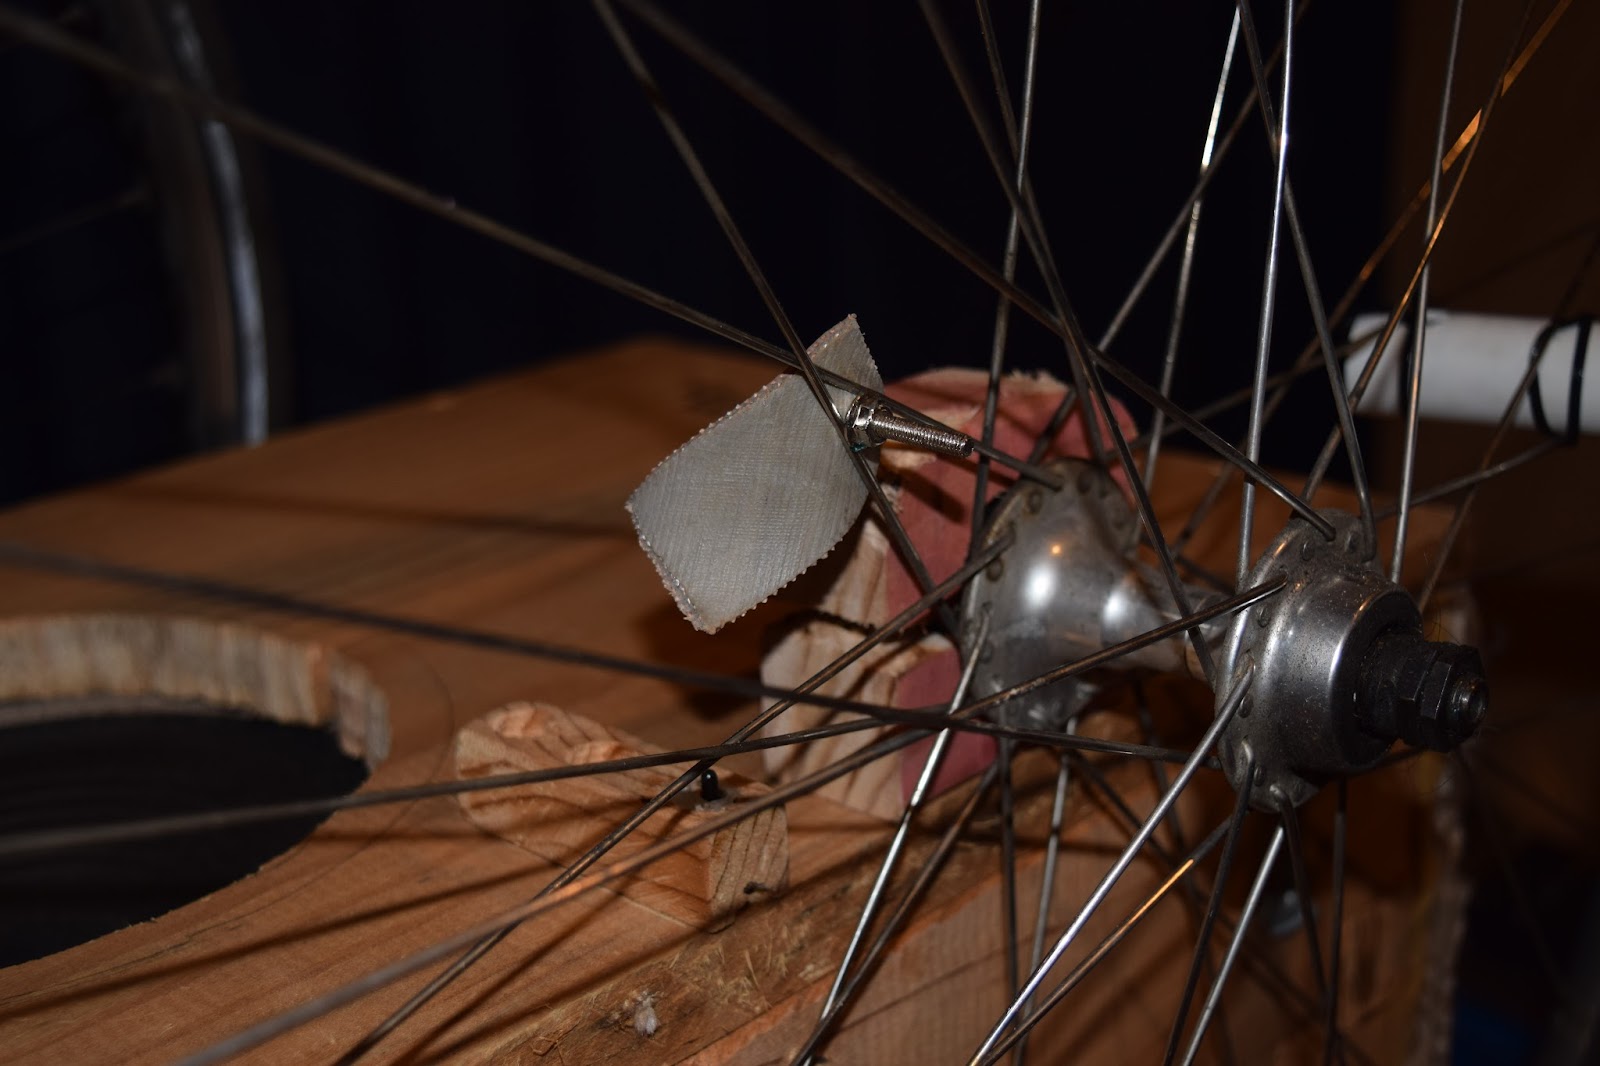
Not only did the interface have to be comfortable, it had to be tactile and gestural; allowing the user to make large movements accurately. The two sliders are based on conventional potentiometers, and are very simple: Each one consists of a high-resistance track (with one end connected to ground and the other connected to 5v on the Arduino) and a wiper (connected to the analog inputs of the Arduino). The track is repurposed NiChrome wire from an old fan heater, and the wiper is a filed-down bolt, turned upside down, with a wire wrapped around and soldered to it, and a wooden fader knob on top.
Two grooves were cut (~8x8mm deep/wide) into a long piece of wood. Wires were soldered onto the ends of the heater wire for ground and power. The heater wire was then hot-glued into place in the track. Corresponding slits were cut into the plastic top to allow the wiper screws to poke up through it. The piece of wood was cut to length and screwed into the box about 3mm below the plastic top, in order to let the wiper wires move properly. The edges of the wooden track and the plastic slits were trimmed and smoothed off with a stanley knife to allow the wiper to move smoothly. This part, along with just getting the plastic to sit flat, took the most time to get right in the whole project. The first plastic top was thermoformed with a heat gun around the wooden parts of the box, but it just wouldn’t sit flat enough and had to be scrapped in favour of just a flat top. The Arduino is just screwed to the underside, at a position where all the wires reach it easily. In future I might move it to the back of the box to make the USB cable faster to plug in. The sensors are surprisingly stable for such a simple redneck design;  particular notes can be held and returned to very easily and musically.
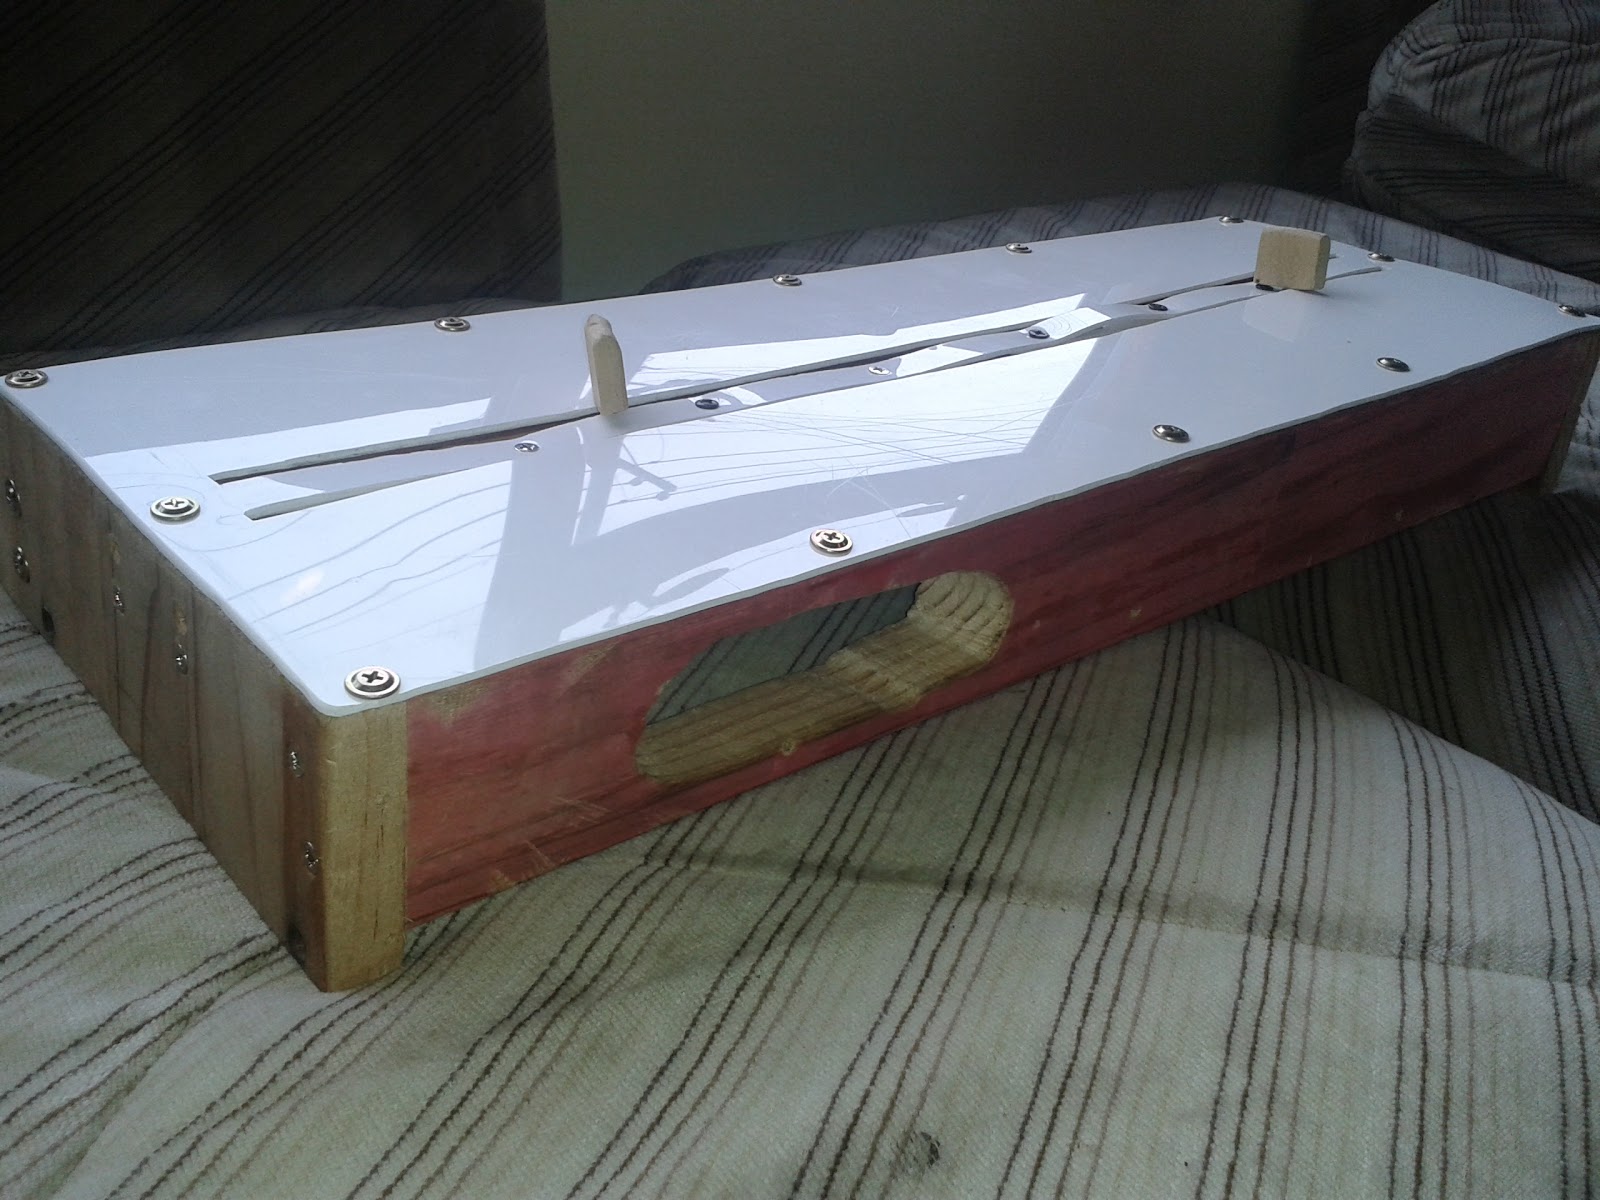
Fig. 4: Rear view. Note the carry handle. Turned out to be very useful!
Fig. 5: Close-up on the NiChrome wire tracks.
Fig. 6: Wiper with knob. A filed-down bolt has a wire wrapped around and soldered to it.
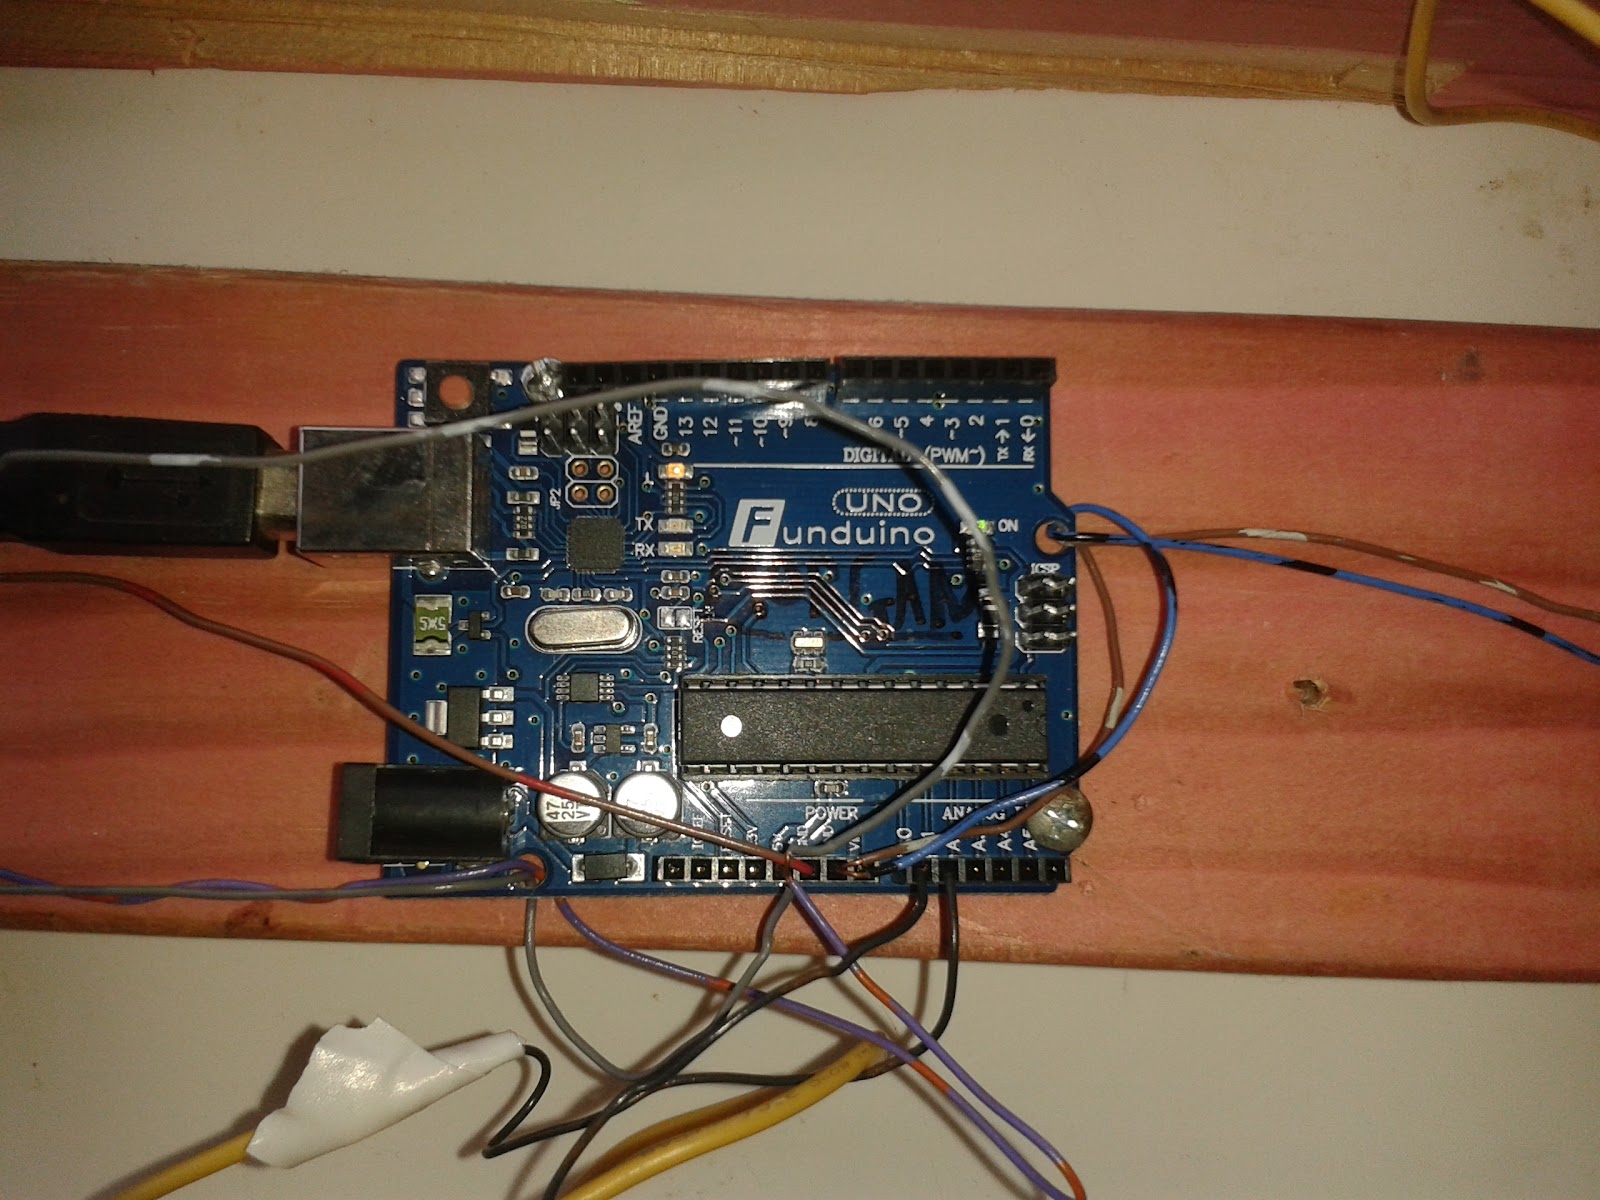
Fig.7: The Arduino Uno, with everything connected. A smaller Arduino could be used here
Firmware/Software
Arduino Code
The Arduino code is very simple (just a small paragraph). It sets up the two analog input pins (A0 and A1) and the serial, reads the pins and then prints the two values like this (minus quotation marks): “[ A0 , A1 ]” to the serial port every 10ms. By default the analogRead() system reads voltages of 0 - 5v as integers from 0 - 1023, which works really nicely here. This paragraph is actually longer than the Arduino code itself. Some signal conditioning was considered but the sensors perform so reliably that none was needed.
Fig 8: The full arduino program.
ChucK Code
Here the serial data is parsed using Regular Expressions, converted from ascii to integers, and fed into the .freq methods of the two oscillators. Regular Expressions is incredibly powerful, but also difficult to use and very easy to mess up. ChucK really needs a new, easier way to parse incoming information, particularly if they’re just comma-separated values. At the start of the code, the gain structure and the oscillators are set up, with the accompaniment oscillator going through a light delay just to give it some subtle character. The ring modulation works like this:
adc => Gain master => dac;
3 => master.op;
TriOsc s => master;


The ‘.op’ method tells the Gain ugen to multiply incoming signals instead of summing them, resulting in the sum and the difference between the signals. This was not documented anywhere and I only knew about it because of a short example I had been given last year that used it. The numbers 1 and 2, when chucked to the .op method both sound the same, and one of them probably tells the Gain ugen to operate in it’s default mode (summing).


Two shreds are sporked together in my code: The SerialPoller and the main loop. The SerialPoller is mostly unmodified code from the lecture slides which parses the serial data, converts it to integers, and then writes it to the data[] array. The main loop writes the values in the data[] array to the .freq methods of the two oscillators. The accompaniment oscillator’s frequency is halved here to give it more options for bass notes. 100ms is then passed (because of how ChucK works, you have to pass time to allow for things to happen), and the loop goes around again. I tried taking it down to 10ms (the speed the arduino is writing data to serial) but the sliders felt too sterile and there wasn’t enough rhythm happening. 100ms provides a sort of frenetic base rhythm to the performance while still being fast or responsive enough to feel accurate, and it still feels like the notes change when you move the sliders. Perhaps in future I will add a knob to the interface which controls the rate of the loop, and therefore the rhythms produced. It might be interesting to make really long rhythms that update the notes really slowly, for even more of a drone effect.


Motivation, Related and Future Works
The original motivation for this project came from an idea I had about delay units. I was messing around in Jack one day with my friend on a Raspberry Pi, and we tried out the inbuilt delay effect it had. When the delay length was shortened, the data in the latter half of the buffer remained there. This meant that when the delay time was lengthened again, the old data mixed with the new in a really interesting way. Months of daydreaming later, I had a pretty good idea of how this could be made into a physical unit; with a long slider for each of the two ends of the delay ‘window’; within a larger buffer. Unfortunately, I couldn’t figure out the exact details of how such a thing would work in ChucK, so I endeavoured to make a program that was good enough to suit the nature of the box with the sliders, which is still a great controller on it’s own. What I’ve made (with the ring modulation) is a good place to start, and it demonstrates the beauty of giant faders really well. However, I still want to write more programs to use with it; to find more ways that large, precise motions can be expressed musically.
In an earlier assignment, we had to analyse other sonic arts projects from the big NIME conferences. I chose to look at a tactile textile interface, where the user stretches and pulls on resistive thread that was sewn into a lycra sheet. While different in nature from my wooden box with sliders, the project had a similar amount of complex, large movement required from the user. This is a really interesting area of interface design that needs a lot of development. Large motions (more than controlling a small volume knob or mixer fader) which have precise effects can be incredibly expressive. A good example of this are the custom musical interfaces built by machinist and musician Tristan Shone for his one-man industrial doom metal band, Author and Punisher. In watching his performances, it’s very clear that more of his emotion can be expressed through larger motions, which gives his music a feeling of being angrier or larger or more primal. While using a lot of the same sounds and synthesiser settings, this music is the polar opposite of the typical modular analog synth musician, who daintily patches things together with little patch cables and carefully programs sequences with little buttons.
The nature of a musical interface can have a huge influence on the music that that instrument produces.
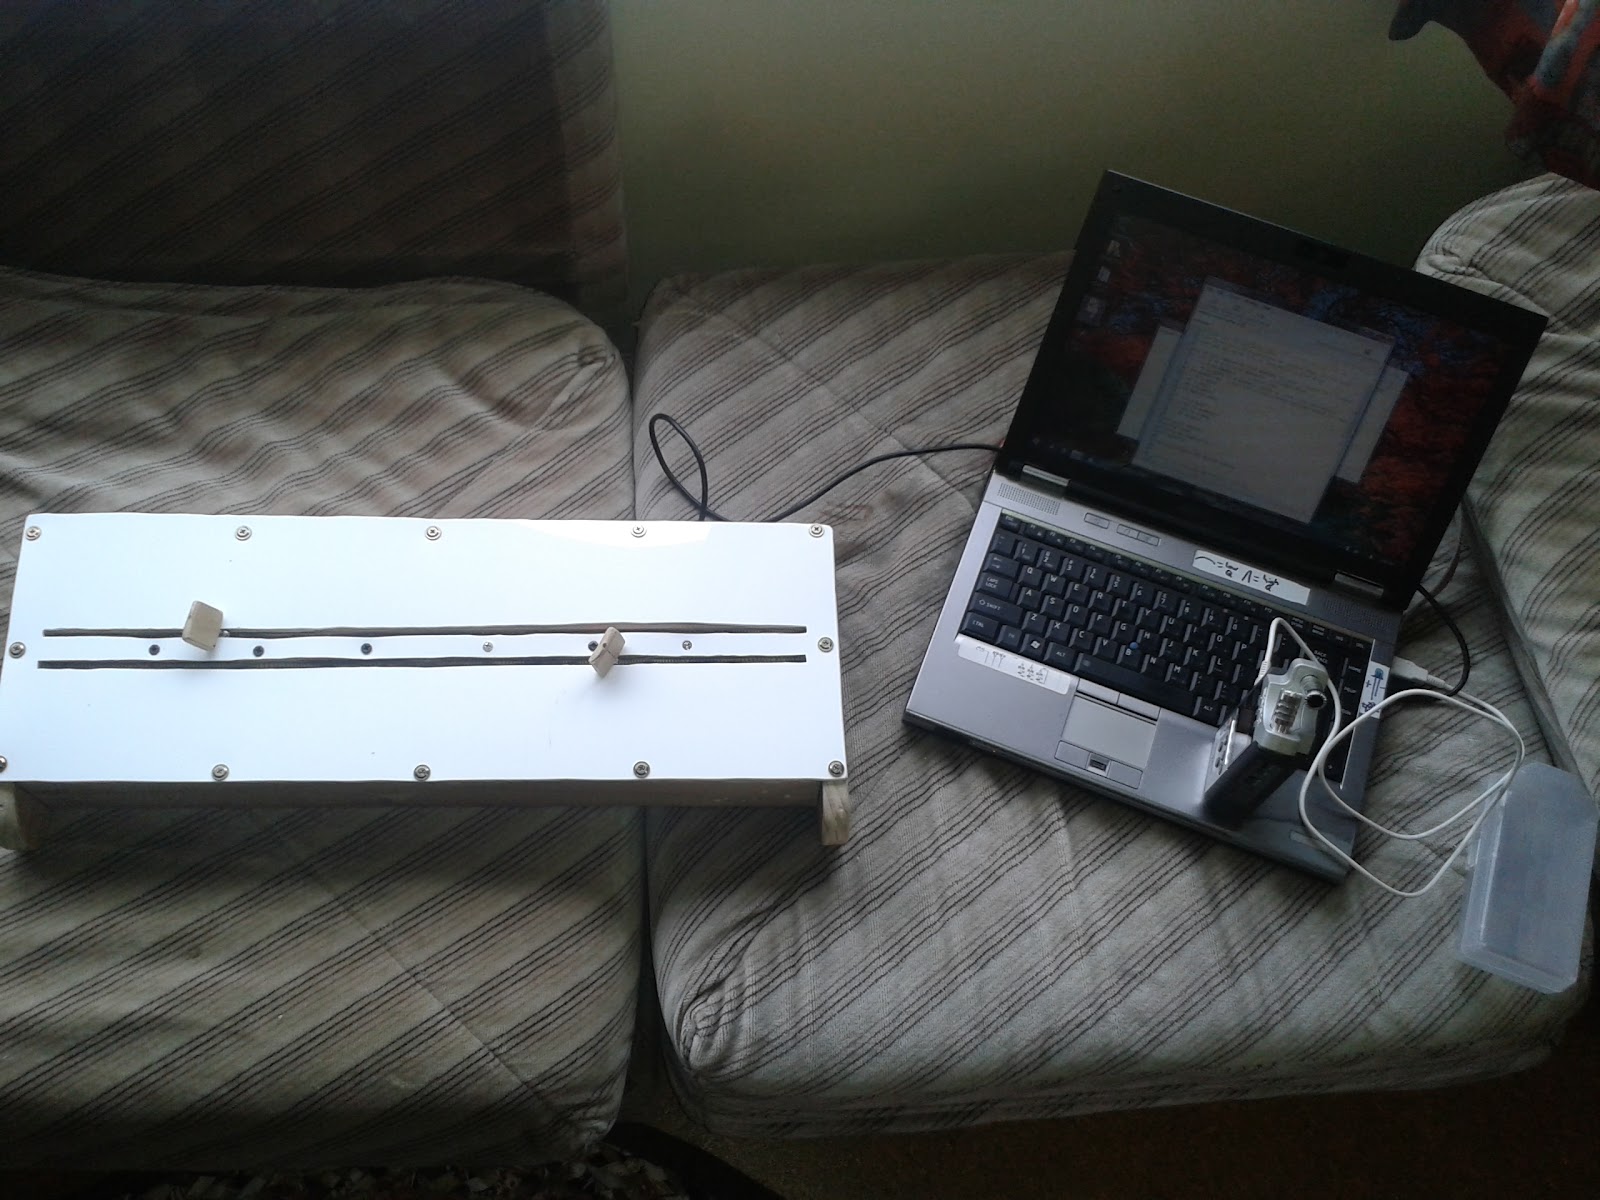
Fig. 9: The full setup, with the box, the laptop, and the Zoom mic/interface.

Finally, here's a video demo with some examples of how it all sounds: https://www.youtube.com/watch?v=BcC3-a6qjvs
References
15min video detailing some of Tristan Shone’s work: https://www.youtube.com/watch?v=23-lRV3qNQk


NIME | Zstretch: A Stretchy Fabric Music Controller: